Have you ever struggled to reach that stubborn nut underneath your sink? Afraid not, because the mighty basin wrench is here to save the day! With its unique design and functionality, it allows you to tighten or loosen those hard-to-reach nuts with ease.
In this article, I will explore its features, uses, and how it can be a game-changer when it comes to tackling plumbing projects.

Table of Contents
- 1 What Is A Basin Wrench Used For?
- 2 What Are The Types of Basin Wrenches?
- 3 How To Use A Basin Wrench On A Kitchen Sink?
- 4 What Size Basin Wrench For The Kitchen Faucet?
- 5 Tips For Using A Basin Wrench
- 6 Final Thoughts
- 7 FAQs (Frequently Asked Questions).
- 7.1 Can A Basin Wrench Be Used For Other Plumbing Applications Besides Sink Basins?
- 7.2 How Do I Know Which Type Of Basin Wrench To Choose?
- 7.3 Can I Use A Regular Wrench Instead Of A Basin Wrench?
- 7.4 What Should I Do If The Nut Is Too Tight And The Basin Wrench Is Not Working?
- 7.5 Are Basin Wrenches Suitable For Both Professional Plumbers And Diy Enthusiasts?
What Is A Basin Wrench Used For?
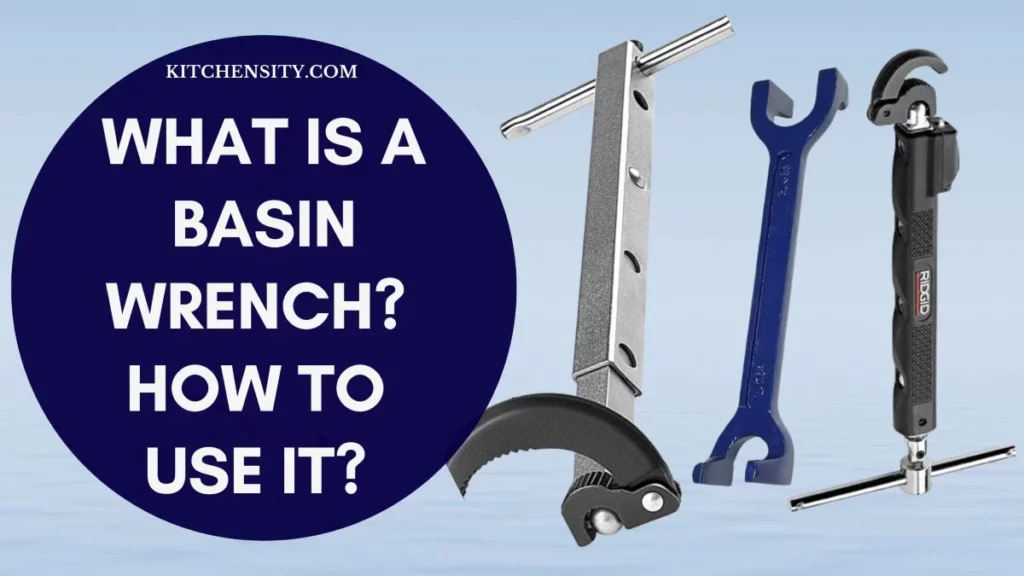
A basin wrench is a specialized plumbing tool used for installing or removing faucets in sinks or basins. It is designed to reach and tighten or loosen the nuts that hold the faucet in place, particularly in tight spaces behind the sink where a standard wrench or pliers cannot reach.
Basin wrenches are commonly used in plumbing projects when replacing or repairing faucets. They allow for easier access to the nuts that secure the faucet to the sink, making the installation or removal process more manageable. The long handle and pivoting jaw of the basin wrench enable it to reach into narrow spaces and grip the nuts securely, facilitating the tightening or loosening of the nuts without damaging the surrounding components.
What Does Basin Wrench Look Like?
A basin wrench typically has a long handle with a pivoting jaw at one end. The handle is often made of steel or another durable material and may have a cushioned grip for comfort. The pivoting jaw is designed to grip onto the nuts that secure faucets to sinks or basins. It can be adjusted to different angles to accommodate various positions and is usually spring-loaded to stay in place during use. The overall shape of a basin wrench is long and slender, allowing it to reach into tight spaces behind a sink.
Also Read – Best Basin Wrench Alternatives
What Are The Types of Basin Wrenches?
There are several types of basin wrenches available, each with its unique features and benefits. Let’s take a closer look at the most common types:
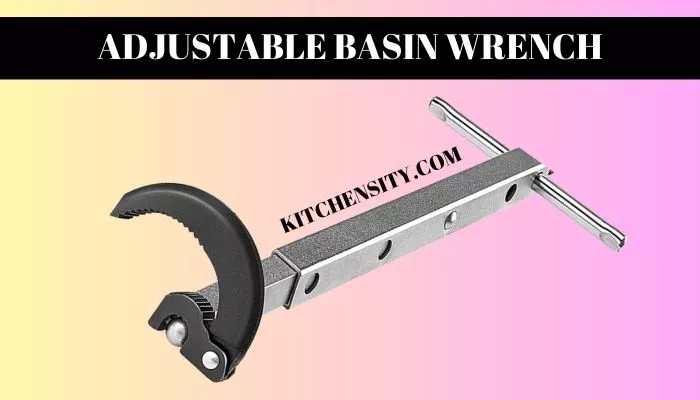
1. Adjustable Basin Wrench.
An adjustable basin wrench is a versatile plumbing tool designed for tightening or loosening nuts in hard-to-reach places, such as those securing faucets to sinks. It consists of a long handle with a pivoting jaw at one end. The jaw can be adjusted to different angles, allowing the wrench to access nuts in tight spaces behind a sink.

The adjustable basin wrench typically has a spring-loaded mechanism that keeps the jaw in place once adjusted. This feature allows the wrench to maintain its position while the user turns the handle to tighten or loosen the nut. The handle of the wrench is often cushioned for comfort during use.
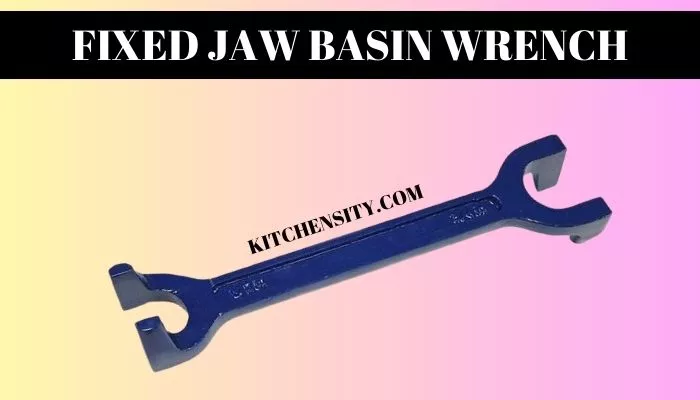
2. Fixed Jaw Basin Wrench.
Fixed jaw basin wrenches are simpler in design compared to adjustable ones. They have a long handle with a fixed jaw at one end, which is angled to provide access to nuts in tight spaces. While they may not offer the versatility of adjustable basin wrenches, they are often more affordable and can be effective for specific tasks where the angle does not need to be adjusted.

Unlike adjustable basin wrenches, which can change angles, fixed jaw basin wrenches have a fixed jaw angle.
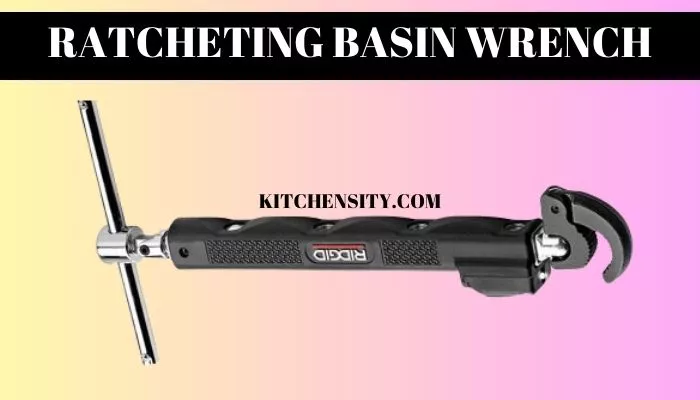
3. Ratcheting Basin Wrench.
Ratcheting basin wrenches are available in both fixed and adjustable jaw configurations, offering versatility for different tasks. They are often preferred by plumbers and DIY enthusiasts for their ease of use and effectiveness in cramped or awkward spaces where traditional tools may struggle to reach. It combines the functionality of a basin wrench with a ratcheting mechanism, allowing for easier operation in confined spaces.

The ratcheting mechanism allows the wrench to turn the nut in one direction while maintaining its grip, even when there is limited space to move the handle. This makes it easier and more efficient to tighten or loosen nuts in tight spaces, as the user can simply move the handle back and forth without having to reposition the wrench.
Also Read – How To Remove Kitchen Faucet Without Basin Wrench?
How To Use A Basin Wrench On A Kitchen Sink?
If you’re facing a plumbing issue with your kitchen sink and need to work on the fittings or replace certain parts, it can come to your rescue. Now that we understand the basics of a basin wrench and its types, let’s dive into how to use it effectively.
1. Preparing For The Task.
Before you begin using a basin wrench on your kitchen sink, it’s important to take a few preparatory steps to ensure a smooth and hassle-free experience.
- Shut Off The Water Supply: Locate the water supply valves under the sink and turn them off. This will prevent any water flow while you work on the fittings, minimizing the risk of leaks or water damage.
- Clear The Area: Remove any items from under the sink that might obstruct your access to the plumbing fittings. Clearing the area will provide you with ample space to maneuver the basin wrench effectively.
- Step 3: Get The Materials: Lubricant, Adjustable Wrench, Towels Or Rags, Safety Gloves, Bucket Or Container.
2. Steps To Use A Basin Wrench On A Kitchen Sink.
Now let’s dive into how to use it on a kitchen sink to tighten or loosen nuts and bolts.
Step 1: Select The Right Basin Wrench.
Choose a basin wrench that is suitable for your specific kitchen sink fittings. Consider the size of the nuts and the space constraints you’ll be working in. Adjustable basin wrenches are typically a good choice as they provide versatility.
Step 2: Position The Wrench.
To ensure a secure grip and effective operation of the basin wrench, follow these steps to position it properly:
- Locate the nut that you need to work on beneath the sink or plumbing fixture.
- Position the wrench over the nut, aligning the pivoting jaw with the flats of the nut. The flats are the flat sides of the nut where the wrench can gain maximum grip and stability.
- Double-check that the jaw is firmly and squarely positioned on the nut. Ensure that it is not tilted or at an awkward angle, as this may affect the wrench’s performance.
- Make sure the handle of the basin wrench is facing in a direction that allows for easy turning. Position it in a way that feels comfortable and natural for your hand.
- Hold the wrench firmly, gripping the handle with a secure and comfortable grip. This will provide you with better control and leverage during the turning process.
With the wrench in the proper position, you are now ready to proceed with the tightening or loosening of the nut with confidence and efficiency.
Step 3: Loosen Or Tighten The Nut.
- Loosening A Nut:
- Identify the nut that needs to be loosened and ensure that the basin wrench is securely positioned over it.
- If the nut is stuck or excessively tight, consider applying a penetrating oil or lubricant to help loosen it. Spray or apply the lubricant directly onto the threaded area of the nut.
- Allow the lubricant to penetrate the threads for a few minutes or as instructed by the manufacturer.
- Firmly grip the handle of it.
- Begin turning the handle counterclockwise, applying steady and controlled pressure.
- Use your other hand to support and stabilize the plumbing fixture if necessary.
- Continue turning the handle until the nut starts to loosen.
- If the nut is particularly stubborn, you may need to apply more force gradually, but still avoid excessive force to prevent damage.
- Tightening A Nut:
- Position the basin wrench over the nut that requires tightening.
- Firmly grip the handle of it, ensuring a secure hold.
- If needed, apply a small amount of lubricant to the threaded area of the nut to facilitate smooth tightening.
- Begin turning the handle clockwise, applying steady pressure in a controlled manner.
- Use your other hand to support and stabilize the plumbing fixture as needed.
- Continue turning the handle until the nut is tightened to the desired level.
- Be cautious not to overtighten, as this can lead to damage or leaks.
Step 4: Removing The Wrench.
Once you’ve loosened or tightened the nut to your desired level, carefully remove the basin wrench. Lift it away from the nut while ensuring a smooth disengagement. Take care not to disturb any surrounding fittings.
You May Also Like: How To Unclog A Sink Clogged With Coffee Grounds?
What Size Basin Wrench For The Kitchen Faucet?
When it comes to selecting the right size basin wrench for a kitchen faucet, it’s important to consider the specific dimensions of your faucet fittings. Kitchen faucets typically have different sizes of mounting nuts, and they need to match those sizes for effective use.
The most common sizes of mounting nuts for kitchen faucets are 1/2 inch and 3/4 inch.
To determine the size of the basin wrench you need, measure the width across the flats of the mounting nut. This measurement will help you identify the appropriate size of the wrench to use. It often comes with an adjustable jaw that can accommodate different nut sizes. These adjustable wrenches are versatile and can be a convenient option if you have multiple faucet sizes or are uncertain about the exact size.
Also, you can opt for a basin wrench set that includes multiple sizes of wrenches, allowing you to have the right tool for various plumbing tasks. Choosing a basin wrench that fits securely around the mounting nut is important to ensure a proper grip and minimize the risk of slipping or damaging the faucet. Taking the time to select the correct size will make the task of removing or installing a kitchen faucet much easier and more efficient.
You May Also Like: 6 Pull Out Spray Kitchen Faucet Problems
Tips For Using A Basin Wrench
Using a basin wrench can be a bit tricky, especially if you’re not familiar with the tool. Here are some tips to help you use a basin wrench effectively:
- Position the basin wrench in such a way that the jaw is securely placed around the nut you need to tighten or loosen. Ensure that the wrench is at the right angle to provide maximum leverage.
- If you’re using an adjustable basin wrench, adjust the jaw to the appropriate angle for better access to the nut. Make sure the jaw is securely locked in place before turning the wrench.
- Ensure that the jaw of the wrench grips the nut firmly to avoid slipping. If the nut is difficult to turn, apply some penetrating oil to help loosen it.
- Use smooth and controlled movements to turn the wrench. Avoid applying too much force, as this can damage the nut or the surrounding components.
- Remember that the basin wrench is designed to turn the nut in a specific direction. Check the direction of the threads on the nut before turning the wrench to avoid stripping the threads.
- Ensure that there is enough clearance around the nut to allow the wrench to turn freely. If the space is too tight, consider using a ratcheting basin wrench for easier operation.
- After using the basin wrench, clean it thoroughly to remove any dirt or debris that may affect its performance. Store it in a dry place to prevent rusting.
Also Read – How To Lubricate A Swivel Faucet?
Final Thoughts
A basin wrench is an indispensable tool for plumbing tasks, particularly when working with sink basins. Whether you’re replacing a faucet, fixing a leak, or installing a new sink, the basin wrench empowers you to take on these tasks with confidence and ease. Its adjustable jaw allows for a customized fit, accommodating a range of nut sizes without the need for multiple wrenches. The ergonomic handle ensures a comfortable grip, reducing strain and fatigue during extended use.
By following the simple steps of selecting the right wrench, positioning it accurately, and applying controlled force, you can tackle plumbing challenges with precision, and efficiency. It gives you the leverage and grip needed to loosen or tighten nuts, even in the most challenging of spaces.
Also Read – How To Remove Handle From Faucet?
FAQs (Frequently Asked Questions).
-
Can A Basin Wrench Be Used For Other Plumbing Applications Besides Sink Basins?
While a basin wrench is primarily designed for sink basins, it can also be used in other plumbing applications where a similar nut needs to be tightened or loosened in a tight space.
-
How Do I Know Which Type Of Basin Wrench To Choose?
Consider factors such as the nut size, the space you’re working in, and the type of fitting you’re dealing with. Adjustable basin wrenches offer more versatility, while fixed jaw wrenches provide a more secure grip.
-
Can I Use A Regular Wrench Instead Of A Basin Wrench?
Regular wrenches may not fit properly or provide the necessary leverage in tight spaces like sink basins. It is recommended to use a basin wrench specifically designed for these applications.
-
What Should I Do If The Nut Is Too Tight And The Basin Wrench Is Not Working?
If the nut is excessively tight, you can try using a penetrating oil or lubricant to loosen it. Allow the lubricant to penetrate the threads before attempting to use the basin wrench again.
-
Are Basin Wrenches Suitable For Both Professional Plumbers And Diy Enthusiasts?
Yes, basin wrenches are commonly used by both professional plumbers and DIY enthusiasts. They are versatile, easy to use, and essential for various plumbing tasks.
Katrina Smith is a seasoned expert with over 25 years of experience in all things related to cooking and the kitchen. As an avid cook and kitchen enthusiast, she is passionate about sharing her knowledge and expertise on cookware, kitchen appliances, kitchen tips, and kitchen staples.
Through her articles and reviews, Katrina aims to inspire and help others improve their cooking skills, experiment with different ingredients, and invest in quality cookware and appliances.

![How To Unclog A Sink Clogged With Coffee Grounds? [3 Effective Ways] 6 How-to-Unclog-a-Sink-Clogged-With-Coffee-Grounds](https://www.kitchensity.com/wp-content/uploads/2020/06/How-to-Unclog-a-Sink-Clogged-With-Coffee-Grounds.jpg)


![Best Insulation Under The Kitchen Sink [3 Top Insulations] 9 Best Insulation Under The Kitchen Sink](https://www.kitchensity.com/wp-content/uploads/2023/04/Best-Insulation-Under-The-Kitchen-Sink.jpg)

