A kitchen faucet is a very essential fixture in our kitchen due to its flexibility and convenience. Getting the right kitchen faucet offers great flexibility in washing and cleaning.
But this great fixture may create problems in the kitchen in due time. There may be water leakage, corrosion, low water pressure, poor installation, etc to name a few.
So, a time comes when we have to remove the kitchen faucet to fix the specific problems. But it becomes so much easy when you have a basin wrench.
But, what if we don’t have a basin wrench? Is it extremely required to have it?
No, it’s not always required to have one but if you own it then your work becomes a lot easier.
So, to remove kitchen faucet without basin wrench, you need some alternative wrenches and pliers to get the job done.

Let’s start:
Table of Contents
- 1 How To Remove Kitchen Faucet Without Basin Wrench?
- 2 Preparing the Workspace Before Removing A Kitchen Faucet
- 3 Materials Required
- 4 Steps To Remove The Kitchen Faucet Without Basin Wrench
- 5 How To Loosen Faucet Mounting Nuts?
- 6 How To Remove Kitchen Faucet Plastic Nut?
- 7 How To Tighten Faucet Nut Under Sink?
- 8 How To Remove Hex Nut From Faucet?
- 9 How To Undo A Nut Without A Wrench?
- 10 Troubleshooting: Problems And Solutions
- 11 Some Safety Precautions
- 12 Conclusion
- 13 YOU MAY ALSO LIKE
- 14 FAQ’s
- 14.1 What Can I Use If I Don’t Have A Basin Wrench?
- 14.2 Is A Basin Wrench Necessary?
- 14.3 What Safety Precautions Should I Take When Removing A Kitchen Faucet?
- 14.4 Are There Alternative Tools To Use Instead Of A Basin Wrench?
- 14.5 Can I Reuse The Removed Kitchen Faucet?
- 14.6 What Should I Do If The Faucet Is Stuck Or Difficult To Lift From The Sink?
How To Remove Kitchen Faucet Without Basin Wrench?
To remove a kitchen faucet without a basin wrench, use alternative tools such as adjustable wrenches, pliers, and screwdrivers. Start by turning off the water valves and disconnecting the water supply lines. Apply grease to loosen the mounting nuts, then unscrew them using a screwdriver or suitable wrench. Finally, lift the faucet carefully and clean the area before reinstalling the faucet.
While a basin wrench is helpful, it is not always necessary for this task.
Also Read – Best Basin Wrench Alternatives
Preparing the Workspace Before Removing A Kitchen Faucet
When preparing the workspace for removing a kitchen faucet without a basin wrench, it is essential to create a clean and organized environment that promotes efficiency and safety.
Here are the steps:
- Clear The Area Under The Sink:
- Before you begin, ensure that the area under the sink is clear of any objects or clutter.
- This will give you ample space to work and maneuver as you remove the faucet.
- Remove any cleaning supplies, pipes, or other items that may obstruct your access to the faucet.
- Have A Towel Or Cloth Handy: Keep a towel or cloth nearby to wipe away any excess water that may be present or generated during the removal process. This will help you maintain a clean and dry working area, making it easier to handle the faucet and avoid slipping or accidental damage.
- Consider Using A Bucket:
- To prevent water from dripping onto the floor or creating a mess, place a medium-sized bucket beneath the sink.
- This will catch any water that may leak from the faucet or pipes when you disconnect them.
- Having the bucket in place will save you from having to clean up any spills afterward and keep your workspace tidy.
- Turn Off The Water Supply:
- While not directly related to preparing the workspace, it is crucial to mention the importance of turning off the water supply before beginning the removal process.
- This step ensures that no water is flowing through the faucet and helps prevent any unwanted leaks or water damage during the procedure.
Also Read – How To Fix A Faucet Handle That Turns Too Far?
Materials Required
As the most essential thing is the basin wrench, but here we will not use it, so you will these items:
- Adjustable Wrench or Channel-lock Pliers.
- Screw Driver.
- Socket Wrenches.
- Gauging Tape.
- Towel or a cloth.
- Penetrating Oil or Grease.
- Putty Knife or Any flat plastic scraper (if needed).
Once you have arranged the items, now let’s start.
Also Read – Low Water Pressure In The Kitchen Sink: How To Fix It?
Steps To Remove The Kitchen Faucet Without Basin Wrench
Here are the steps to remove the faucet without any problem:
1. Turn The Valves Off
Our first work is to turn off the valves. If you have two valves, hot and cold, turn off both.
Because doing this will cut the water supply and your kitchen will not be flooded.
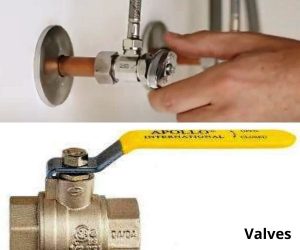
If you are not getting the valves, then these are just located below the sink. You can see the picture for reference, usually, most of the valves look like this.
Also, place a medium-sized bucket below the sink, in case any unwanted water drips, it will not create any mess.
You May Also Like: 6 Pull Out Spray Kitchen Faucet Problems
2. Removing The Faucet
Now your real journey begins:
Disconnect The Water Supply Lines
From this step, it takes little time depending on how old your faucet is. Take the adjustable wrench or channel-lock plier to disconnect the water supply lines.
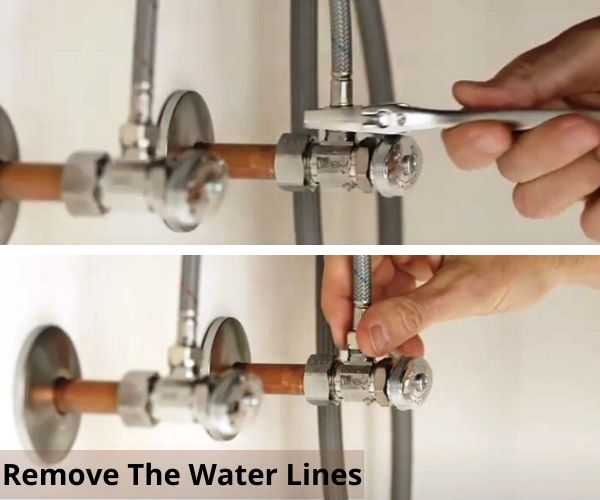
If you have two lines for hot and cold water, then disconnect both of them.
Disconnecting water supply lines will ensure that there is no water pressure and you can remove the faucet much more quickly.
Also Read – How To Lubricate A Swivel Faucet?
Unscrew And Remove The Mounting Nuts
This process is a little irritating because water contains minerals that are responsible for rusting the mounting nuts or may block the nuts depending on how old your faucet is.
That’s why spray some penetrating oil or apply some grease on the mounting nuts and wait for at least 15 minutes.
This will smooth the process. In case, you don’t know about mounting nuts, they are attached to secure the faucet to the sink.
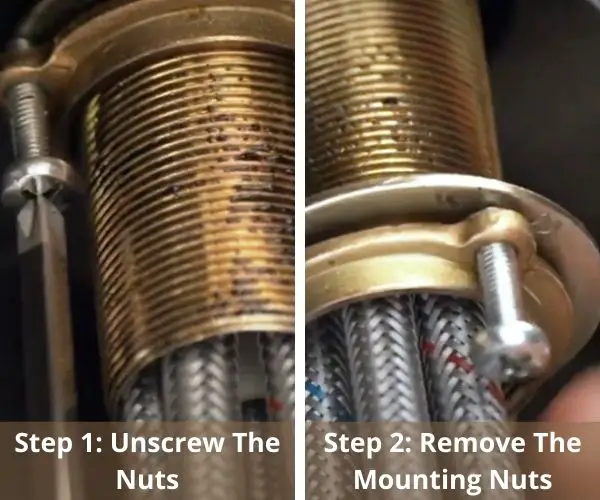
Now unscrew the nuts using a screwdriver, and make sure to turn the nuts counterclockwise to remove them.
Now you can easily remove the mounting nuts (this process is for a newer version of the kitchen faucet).
For the older version of the kitchen faucet (you can refer to the picture), you might need a basin wrench. Because it will help you to remove the mounting nuts faster.
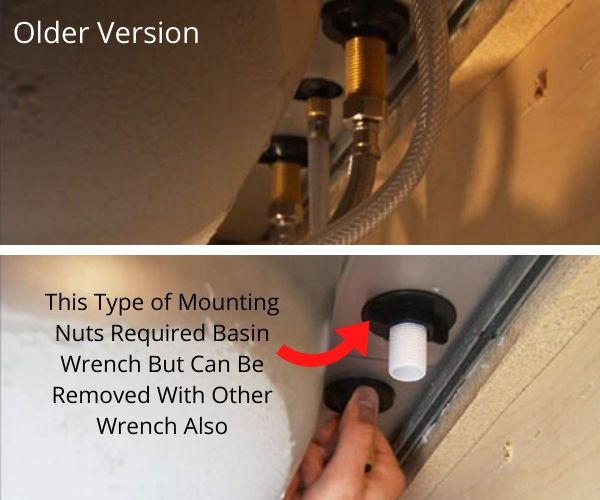
Although it is not necessarily needed, you can use any wrench or plier that fits the nuts and unscrew them. But in case you need it, then you can check one at Amazon.
You May Also Like: How to Unclog a Sink Clogged With Coffee Grounds?
Finally, Remove The Faucet
You have turned off the valves, disconnected the water lines, and removed the mounting nuts, now finally, it’s time to remove the kitchen faucet.
Now, carefully lift the kitchen faucet from the sink and place it in a safe place.
You can remove all the parts of the faucet and clean it nicely.
After cleaning, you can again install the faucet to the sink and screw the mounting nuts, water lines, and on valves.
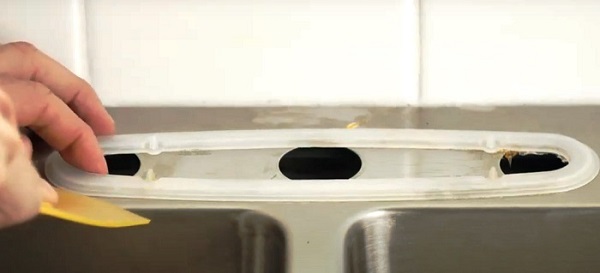
If it sticks while lifting, then use a plastic putty knife or any flat plastic scraper to gently work it loose without scratching the sink and clean the surface with a cloth.
That’s it !!! Done.
If you want to know, how to remove a kitchen faucet with a basin wrench for an older faucet then this video may help.
Also Read – How To Fix A Stiff Kitchen Faucet?
How To Loosen Faucet Mounting Nuts?
Loosening faucet mounting nuts can sometimes be a challenging task, especially if they are stuck or corroded.
Here’s a step-by-step guide on how to loosen faucet mounting nuts effectively:
- Prepare The Workspace: Before starting, ensure that you have cleared the area under the sink and have a towel or cloth handy to catch any dripping water. This will make it easier to access the mounting nuts and prevent any potential mess.
- Apply A Penetrating Oil Or Lubricant: Spray a penetrating oil or apply a lubricant, such as WD-40, onto the mounting nuts. Allow the oil or lubricant to penetrate and work its way into the threads of the nuts. This helps to loosen any rust or corrosion and makes it easier to turn the nuts.
- Give It Some Time: After applying the penetrating oil or lubricant, give it some time to work. Let it sit for about 15 minutes or longer, depending on the severity of the rust or corrosion. This allows the oil to penetrate deeply and loosen the nuts effectively.
- Use An Adjustable Wrench Or Pliers: Once the penetrating oil has had time to work, use an adjustable wrench or pliers to grip the mounting nut. Make sure to position the tool securely around the nut to ensure a firm grip.
- Turn Counterclockwise: With a firm grip on the mounting nut, apply steady force in a counterclockwise direction. Turning counterclockwise loosens the nut. Be cautious not to use excessive force as it may damage the nut or faucet. If the nut is still not budging, try using a longer wrench or pliers for increased leverage.
- Tap With A Hammer: In cases where the mounting nut is extremely stubborn, you can try tapping it gently with a hammer. This can help to loosen the nut by breaking up any corrosion or rust. Be careful not to strike the faucet or other components directly; instead, tap the side of the nut.
- Repeat The Process If Necessary: If the nut doesn’t loosen initially, repeat the steps above, applying more penetrating oil or lubricant if needed. It may take a few attempts to completely loosen the nut, particularly if it is severely corroded.
By following these steps, you should be able to effectively loosen faucet mounting nuts.
Remember to exercise caution, use the appropriate tools, and be patient throughout the process.
Also Read – How To Fix A Spinning Faucet Handle?
How To Remove Kitchen Faucet Plastic Nut?
If your kitchen faucet has a plastic nut that needs to be removed, you have to first prepare your workspace and turn off the water supply and, then follow these steps:
- Disconnect The Water Supply Lines: Use an adjustable wrench or pliers to disconnect the water supply lines from the faucet. Turn the nuts counterclockwise to loosen and remove them. Ensure that any residual water is caught in a bucket or towel to avoid creating a mess.
- Identify The Plastic Nut: Locate the plastic nut that secures the faucet to the sink. It is typically located beneath the sink, where the faucet connects to the countertop or sink deck. It may be visible or partially covered by other components.
- Apply Penetrating Oil Or Lubricant: If the plastic nut is tight or difficult to remove, you can apply a penetrating oil or lubricant to help loosen it. Spray the oil or apply the lubricant directly onto the nut and allow it to sit for a few minutes. This will help to break up any corrosion or provide lubrication for easier removal.
- Use Pliers Or A Wrench: Depending on the size and shape of the plastic nut, you can use adjustable pliers or a wrench to grip and turn it counterclockwise. Ensure that the tool is securely positioned on the nut for a firm grip. Apply steady and even pressure to loosen the nut.
- Wiggle Or Rock The Nut: If the plastic nut is still stubborn, you can try gently wiggling or rocking it back and forth while applying pressure. This can help to break any seal or blockages and make them easier to remove.
- Remove The Plastic Nut: Once the plastic nut is sufficiently loosened, you can continue turning it counterclockwise by hand until it is fully removed. Set the nut aside for disposal.
- Lift And Remove The Faucet: With the plastic nut removed, carefully lift the faucet from the sink or countertop. Take caution not to damage any surrounding components or scratch the surface. Set the faucet aside in a safe place.
By following these steps, you should be able to successfully remove a kitchen faucet plastic nut.
Also Read – How To Remove Handle From Faucet?
How To Tighten Faucet Nut Under Sink?
To tighten a faucet nut under the sink, follow these steps:
- Identify The Loose Nut: Locate the nut that needs to be tightened. It is typically found under the sink where the faucet connects to the countertop or sink deck. Ensure that the water supply valves are turned off before proceeding.
- Use Adjustable Pliers Or Wrenches: Depending on the size and type of nut, choose adjustable pliers or a wrench that can grip it securely. Position the tool around the nut, ensuring a firm grip.
- Turn The Nut Clockwise: Apply gentle pressure and turn the nut clockwise (to the right) to tighten it. Be cautious not to overtighten, as it can damage the nut or faucet assembly. Tighten the nut until it is snug and no longer loose.
- Check For Stability: After tightening the nut, check the faucet for stability. Hold onto the faucet and try wiggling it to ensure it is securely fastened. If there is no movement or minimal play, the nut is likely tightened correctly.
- Reconnect Water Supply Lines: Once the faucet nut is securely tightened, you can reconnect the water supply lines. Use an adjustable wrench or pliers to tighten the nuts on the water supply lines. Turn them clockwise to secure the connections.
- Turn On The Water Supply: With the connections tightened, turn on the water supply valves under the sink to restore the water flow. Check for any leaks around the connections and address them if necessary.
By following these steps, you can effectively tighten a faucet nut under the sink.
Remember to use the appropriate tools, apply gentle pressure, and ensure the nut is snug without overtightening.
Regularly checking and tightening loose nuts helps maintain the stability and proper functioning of your faucet.
You May Also Like: How To Unclog A Sink Clogged With Coffee Grounds?
How To Remove Hex Nut From Faucet?
To remove a hex nut from a faucet, follow these steps:
- Identify The Hex Nut: Look for the hex nut that needs to be removed. It is typically located on the underside of the faucet handle or near the base of the faucet body. The hex nut will have six sides and can be made of metal or plastic.
- Use An Adjustable Wrench Or Pliers: Select an adjustable wrench or pliers that can securely grip the hex nut. Adjust the tool to fit the size of the nut. Ensure that the tool is positioned properly on the nut for a firm grip.
- Turn Counterclockwise: With a firm grip on the hex nut, apply steady force in a counterclockwise direction. Turning counterclockwise loosens the nut. Be cautious not to use excessive force as it may damage the nut or faucet. If the nut is still not budging, try using a longer wrench or pliers for increased leverage.
- Apply Penetrating Oil Or Lubricant (If Necessary): If the hex nut is tight or difficult to remove, you can apply a penetrating oil or lubricant to help loosen it. Spray the oil or apply the lubricant directly onto the nut and allow it to sit for a few minutes. This can help break up any corrosion or provide lubrication for easier removal.
- Wiggle Or Rock The Nut (If Necessary): If the hex nut is stubborn and not easily loosening, you can try gently wiggling or rocking it back and forth while applying pressure. This can help break any seal or corrosion and make it easier to remove.
- Remove The Hex Nut: Once the hex nut is sufficiently loosened, continue turning it counterclockwise by hand until it is fully removed. Set the nut aside for disposal.
By following these steps, you should be able to successfully remove a hex nut from a faucet.
If you encounter any difficulties, consider seeking assistance from a professional plumber.
Also Read – How To Remove Flow Restrictor From The Kitchen Faucet?
How To Undo A Nut Without A Wrench?
If you don’t have a wrench available, there are a few alternative methods you can try to undo a nut:
- Use Pliers: Adjustable pliers can provide a strong grip on the nut. Position the pliers around the nut and turn counterclockwise to loosen it.
- Use Locking Pliers: Locking pliers, also known as Vise-Grips, can be effective in gripping and turning nuts. Adjust the pliers to fit the nut and use them to loosen it.
- Use A Socket And Ratchet: If you have a socket set with a ratchet handle, select a socket that fits the nut and use the ratchet to turn it counterclockwise.
Remember, these methods may not be as effective as using a proper wrench, so use them with caution and ensure you have a secure grip on the nut to prevent slipping and potential injury.
Also Read – How To Fix A Leaky Kitchen Faucet?
Troubleshooting: Problems And Solutions
Troubleshooting common issues or challenges that may arise during the removal process:
Stuck Or Rusty Mounting Nuts
Problem: The mounting nuts may be stuck or rusty, making them difficult to unscrew.
Solution:
- Before attempting to unscrew the mounting nuts, apply a penetrating oil or grease to lubricate them.
- Allow the lubricant to work for at least 15 minutes before attempting to remove the nuts. This will help loosen them and make the process easier.
- If the nuts are severely rusted, you may need to apply more penetrating oil or use a wrench or pliers with more leverage to loosen them.
- Be cautious not to apply excessive force, as it may damage the faucet or sink.
Limited Access Or Tight Space
Problem: Limited access or a tight space under the sink can make it challenging to reach and remove the faucet components.
Solution:
- If the space is too tight to use a regular wrench or pliers, consider using a basin wrench or a specialized tool designed for confined spaces.
- These tools have an adjustable head or swivel feature that allows for easier access and maneuverability.
- Alternatively, you can try using a strap wrench or locking pliers to loosen and remove the mounting nuts.
- These tools offer a secure grip and can be adjusted to fit in tight spaces.
Corroded Water Supply Lines:
Problem: The water supply lines may be corroded or tightly connected, making them difficult to disconnect.
Solution:
- If the water supply lines are corroded, apply penetrating oil or grease to the connections and allow it to work for a few minutes.
- This will help loosen the corrosion and make it easier to disconnect the lines.
- If the connections are still stubborn, use an adjustable wrench or channel-lock pliers to provide extra leverage while turning and loosening the connections.
- Be careful not to apply excessive force to avoid damaging the supply lines.
Stubborn Faucet Handles Or Parts:
Problem: The faucet handles or other parts may be difficult to remove due to mineral buildup or aging.
Solution:
- If the faucet handles or other parts are stubborn and don’t easily come off, try using a penetrating oil or warm water and vinegar solution to break down mineral deposits.
- Let the solution sit for a while to loosen the buildup.
- If necessary, use a rubber mallet or gently tap the parts with a hammer to help loosen them.
- Be cautious and apply gradual force to avoid causing damage.
- If all else fails, consult the manufacturer’s instructions or seek professional assistance.
Some Safety Precautions
Ensuring safety during the removal process is of utmost importance.
Emphasizing safety precautions throughout the article will help readers approach the task with caution and minimize the risk of accidents.
Here are some safety precautions that you should take:
- Turn Off The Water Supply.
- Use Caution When Handling Tools.
- Protect Yourself (Wear Protective Gloves).
- Be Mindful Of Potential Hazards.
- Avoid Straining Or Overexertion.
- Properly Dispose Of Removed Parts.
Conclusion
It’s said that a basin wrench is a plumber’s best friend, you can’t survive without them.
This simply doesn’t mean that there is no alternative to it. Unless there’s anything major issue you can always solve the problem yourself with the limited tools available.
Whatever I discuss here must help you to remove the kitchen faucet without a basin wrench. These methods are easy enough to inspire you to do the work yourself.
After you removed the faucet, you can clean and use the same sink or you can install a new faucet. It depends upon your choice.
Now, it’s your turn to apply the methods and share your experience with us. Please don’t forget to leave your opinion.
YOU MAY ALSO LIKE
- How To Clean Plastic Kitchen Sink?
- Tighten A Loose Moen Single Handle Kitchen Faucet & Base [3 Steps]
- How To Remove Flow Restrictor From The Kitchen Faucet?
FAQ’s
-
What Can I Use If I Don’t Have A Basin Wrench?
You can use any multipurpose wrench to get your job done or you can use any pliers. The main thing is that the wrench should fit the nut and removes it.
-
Is A Basin Wrench Necessary?
While a basin wrench is a specialized tool designed for reaching and turning nuts in tight spaces, it is not always necessary for removing or installing a kitchen faucet.
In some cases, you can use alternative tools like adjustable wrenches, pliers, or socket wrenches to accomplish the task. -
What Safety Precautions Should I Take When Removing A Kitchen Faucet?
You can take safety precautions like turning off the water supply before starting the removal process. And always be cautious when handling tools, be mindful of potential hazards, and keep a towel or cloth handy to catch any dripping water.
-
Are There Alternative Tools To Use Instead Of A Basin Wrench?
Yes, in addition to adjustable wrenches and pliers, using tools like strap wrenches or locking pliers as effective alternatives to a basin wrench for removing a kitchen faucet.
-
Can I Reuse The Removed Kitchen Faucet?
Yes, after removing the kitchen faucet, you can clean and inspect the parts. If they are in good condition, you can reinstall the faucet or choose to install a new one.
Cleaning the faucet components thoroughly helps maintain their functionality and prolong their lifespan. -
What Should I Do If The Faucet Is Stuck Or Difficult To Lift From The Sink?
If the faucet is sticking or difficult to lift, use a plastic putty knife or a flat plastic scraper to gently work it loose without scratching the sink surface.
This helps to separate any seal or adhesive that may be holding the faucet in place. Always be careful and patient during this process to avoid damaging the sink.
Katrina Smith is a seasoned expert with over 25 years of experience in all things related to cooking and the kitchen. As an avid cook and kitchen enthusiast, she is passionate about sharing her knowledge and expertise on cookware, kitchen appliances, kitchen tips, and kitchen staples.
Through her articles and reviews, Katrina aims to inspire and help others improve their cooking skills, experiment with different ingredients, and invest in quality cookware and appliances.

![How To Unclog A Sink Clogged With Coffee Grounds? [3 Effective Ways] 8 How-to-Unclog-a-Sink-Clogged-With-Coffee-Grounds](https://www.kitchensity.com/wp-content/uploads/2020/06/How-to-Unclog-a-Sink-Clogged-With-Coffee-Grounds.jpg)


![Best Insulation Under The Kitchen Sink [3 Top Insulations] 11 Best Insulation Under The Kitchen Sink](https://www.kitchensity.com/wp-content/uploads/2023/04/Best-Insulation-Under-The-Kitchen-Sink.jpg)

