Are you looking to give your kitchen a fresh new look without the hassle and expense of replacing the entire countertop?
Well, you’re in luck! With the right approach and a little know-how, it is indeed possible to replace your kitchen cabinets without having to replace the countertop.
Imagine transforming your space with updated cabinets while preserving the beautiful surface you already have.
In this guide, we’ll take you through the steps and offer expert tips to help you achieve a kitchen makeover that’s both cost-effective and visually stunning.
Get ready to unlock the secrets of cabinet replacement while keeping your beloved countertop intact!
Table of Contents
- 1 Can You Replace Kitchen Cabinets Without Replacing Countertop?
- 2 Preparation And Planning Before Replacing Cabinets
- 3 Step-By-Step Process To Replace The Kitchen Cabinets
- 4 Some Common Issues To Tackle
- 5 Reinstalling Cabinets And Giving The Finishing Touches
- 6 Can You Replace A Kitchen Sink Without Replacing The Countertop?
- 7 How To Cut Off The Bottom Of A Kitchen Cabinet Without Removing It?
- 8 Maintenance And Care Tips
- 9 You May Also Like
- 10 Final Thoughts
- 11 FAQ’s
Can You Replace Kitchen Cabinets Without Replacing Countertop?
Yes, it is possible to replace kitchen cabinets without replacing the countertop. The process involves careful removal of the old cabinets while supporting the countertop, removing screws and fixtures, and then installing the new cabinets in place.
It’s important to take precautions to protect the countertop during the process and ensure proper alignment and installation of the new cabinets for a seamless and successful replacement.
Refer below for the step-by-step guide.
Also Read – Can You Put Kitchen Cabinets On Top Of Vinyl Plank Flooring?
Preparation And Planning Before Replacing Cabinets
Careful planning and preparation are essential steps before starting a cabinet replacement project.
By taking the time to create a detailed plan and gather the necessary measurements and materials, you can ensure a smoother and more successful renovation process.
Here’s an expansion on the importance of preparation and planning:
- Create A Detailed Layout Or Design Plan:
- Begin by creating a detailed layout or design plan for your new kitchen cabinets.
- Consider factors such as cabinet configuration, storage needs, appliance placement, and overall functionality.
- A well-thought-out plan will help you visualize the result and guide your decisions throughout the project.
- Measure The Dimensions:
- Accurate measurements are crucial for a seamless cabinet replacement.
- Measure the dimensions of the existing cabinets, including the height, width, and depth.
- Take note of any variations or irregularities in the kitchen space that may affect the installation process.
- Measure the dimensions of the countertop as well to ensure that it aligns properly with the new cabinets.
- Make A List Of Materials And Tools:
- Create a comprehensive list of materials and tools required for the cabinet replacement project.
- This may include the new cabinets, cabinet hardware, screws, adhesives, clamps, saws, drills, and any other equipment necessary for the installation.
- A detailed list will help you stay organized and ensure you have all the essential items on hand.
- Consider Electrical And Plumbing Considerations:
- Assess any electrical or plumbing considerations that may arise during the cabinet replacement.
- Determine if any modifications are needed, such as relocating electrical outlets or rerouting plumbing lines.
- Consult with professionals if necessary to ensure that these aspects are properly addressed before starting the project.
- Determine A Realistic Timeline:
- Establish a realistic timeline for the cabinet replacement project.
- Consider factors such as the complexity of the installation, any additional tasks required (e.g., countertop removal or floor protection), and your availability to work on the project.
- Setting a timeline will help you allocate time and resources effectively and avoid unnecessary delays.
- Take Note Of Existing Finishes And Materials:
- Pay attention to existing finishes and materials in the kitchen that may be affected by the cabinet replacement.
- Consider the condition of the walls, backsplash, and flooring.
- Determine if any repairs or modifications are needed to ensure a seamless transition between the new cabinets and the surrounding areas.
- Consult With Professionals: If you’re unsure about any aspect of the project or if it involves complex tasks such as electrical or plumbing work, it’s advisable to consult with professionals. Experienced contractors, kitchen designers, or cabinet installers can provide valuable insights, recommendations, and guidance to ensure a successful renovation.
By emphasizing the importance of careful planning and preparation, you can approach your cabinet replacement project with confidence and reduce the likelihood of mistakes or setbacks.
Taking the time to create a detailed layout, gather accurate measurements, compile a comprehensive materials list, and consider relevant factors will contribute to a smoother and more efficient renovation process.
Also Read – How To Cut Down Kitchen Cabinets?
Step-By-Step Process To Replace The Kitchen Cabinets
Before proceeding with the process, you will need some materials, so collect them first to continue the steps.
Let’s check what materials are required.
Materials Required
- Driver Driller
- Long Hollow Rectangular Iron Pipe or Wood Lumber
- Knife
- Small Wood Lumbers for Vertical Support
- Clamps
- Scraper
Procedures
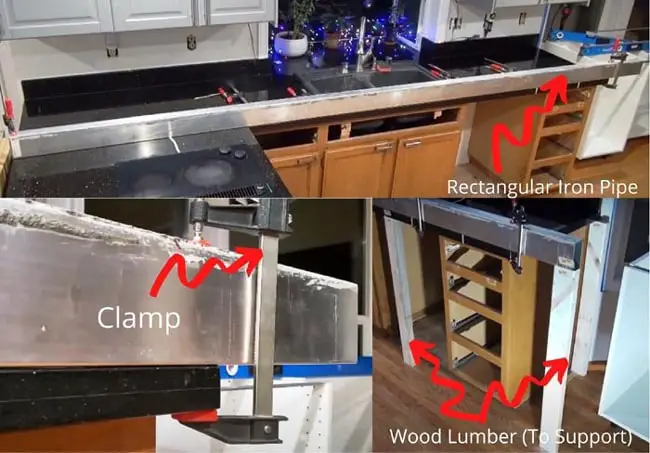
Step 1: Supporting The Countertop In Its Position
You have to support the countertop in its position before removing the countertop. This step is very crucial because when you remove the cabinets, the countertop will fall.
So to prevent it from falling, you have to support it with a stand, table, or any other thing that you find suitable to support the countertop in its position. Follow these steps:
- Take a long hollow rectangular iron pipe or any long solid wood lumber.
- Attach the pipe to the countertop with some clamp to hold it properly.
- Now, take some wood lumber or furring strips and add them vertically to support the iron pipe. You can check the below picture.
Step 2: Remove All The Screws, Hinges, Doors, Or Any Fixtures
You can also do this step initially but don’t try to remove the cabinets at first.
First, unscrew with a driver driller and then remove the doors, drawers, sliders, hinges, or any fixtures attached to the cabinets. Now, you can move to the next step.
Also Read – How To Repair Chipped Paint On Kitchen Cabinets?
Step 3: Remove The Cabinets
You can easily remove the sides of the cabinets, but the upper portion, attached to the countertop, wants some effort.
Because most of the time, these are bonded with strong adhesive, and to remove that, you have to take a knife or any flat utensil to cut the bonding (the sticky rubber-like substance).
Now, pull the base cabinets slowly, and it should come out quickly. After removing, it will leave some sticky rubber-like substance on the lower base of the countertop.
You have to scrape that substance with a scraper or any other tool; otherwise, it will create problems while installing the new kitchen cabinets.
Note: Don’t throw the old cabinets; they are very useful. You can transform them into other furniture or table or shoe rack, etc., or you can flip them to earn money.
You can follow the below video to learn more.
Also Read – How To Draft-Proof Your Under Kitchen Cabinets?
Some Common Issues To Tackle
During a cabinet replacement project, it’s not uncommon to encounter certain issues that may require attention and solutions.
By being aware of these common issues and having strategies to address them, you can overcome obstacles and ensure a successful renovation.
Here are some common issues that readers may face during the process and guidance on how to handle them:
- Dealing With Uneven Walls:
- Uneven walls can pose challenges when installing new cabinets.
- To address this issue, consider using shims, which are thin wedges or spacers, to level the cabinets.
- Place the shims behind the cabinets where needed to ensure a flush and secure fit against the wall.
- Adjust the shims as necessary until the cabinets are properly aligned.
- Once the cabinets are securely in place, trim or sand down any excess shim material and conceal it with trim or molding.
- Repairing Damage To The Countertop:
- Accidents or wear and tear during the cabinet removal process can result in damage to the countertop.
- If minor scratches or chips occur, you can often repair them using appropriate countertop repair kits available in the market.
- Follow the instructions provided with the repair kit to fix the damage and restore the countertop’s appearance.
- In case of significant damage or if the countertop is beyond repair, you may need to consider replacing it entirely.
- Replacing Outdated Plumbing Fixtures:
- If your current cabinets have plumbing fixtures attached to them, such as a sink or dishwasher, you may need to disconnect and replace these fixtures as part of the cabinet replacement project.
- This can involve shutting off the water supply, disconnecting the plumbing connections, and installing new fixtures.
- It’s important to consult with a plumber or a professional familiar with plumbing work to ensure that the replacement is done correctly, adhering to local building codes and regulations.
- Addressing Electrical Considerations:
- Electrical wiring may be present behind or within the existing cabinets.
- Carefully disconnect any electrical connections, ensuring that power is turned off at the main circuit breaker before handling any wiring.
- Take note of the electrical wiring and outlets during the cabinet removal process.
- If modifications or updates to the electrical system are necessary, it’s crucial to consult with a licensed electrician to ensure compliance with safety standards and local electrical codes.
- Handling Obstacles Or Structural Limitations:
- Sometimes, unexpected obstacles or structural limitations may arise during the cabinet replacement process.
- This can include issues such as pipes or vents obstructing the installation or walls that cannot bear the weight of the new cabinets.
- In such cases, it’s important to consult with professionals, such as contractors or structural engineers, to find suitable solutions.
- They can assess the situation, offer recommendations, and help overcome challenges to ensure a safe and successful cabinet installation.
Remember, it’s important to approach these issues with patience and seek professional assistance when needed.
Consulting with experts can help you address complex problems and ensure that the necessary repairs or modifications are done correctly.
By being prepared for potential issues and having contingency plans in place, you can navigate through challenges smoothly and achieve the desired results in your cabinet replacement project.
Also Read – How To Stop A Draught From Behind Kitchen Cupboards?
Reinstalling Cabinets And Giving The Finishing Touches
Once you have successfully removed the old cabinets and addressed any issues, it’s time to reinstall the new cabinets and add the finishing touches to complete your kitchen cabinet replacement project.
Here’s a guide to help you with the reinstallation process and provide tips for finishing touches:
Reinstallation Of New Cabinets
- Alignment And Leveling:
- Start by ensuring proper alignment and leveling of the new cabinets.
- Use a level to make sure they are perfectly straight and adjust the height of each cabinet as needed.
- Shim the cabinets and make necessary adjustments to ensure they are level and aligned with each other.
- Secure Cabinets To The Wall:
- Once the cabinets are aligned, securely attach them to the wall using screws. Locate the wall studs and drill pilot holes to prevent splitting.
- Use cabinet screws to fasten the cabinets to the studs, ensuring a strong and secure installation.
- Check for stability and make any additional adjustments if needed.
- Adjusting Cabinet Doors And Drawers: Adjust the doors and drawers of the new cabinets to ensure proper alignment and smooth operation. Use the adjustment screws or hinges provided with the cabinets to fine-tune the positioning. This will help achieve a uniform and professional look.
- Filling Gaps And Caulking:
- Fill any gaps between the cabinets and the wall or adjacent cabinets using wood filler or caulk. This will create a seamless and finished appearance.
- Choose a color that matches the cabinet finish to ensure a cohesive look. Smooth out the filler or caulk and let it dry completely before proceeding.
Also Read – Why Are My Kitchen Cupboards So Cold?
Finishing Touches
- Cabinet Hardware Installation:
- Install the cabinet hardware, such as handles, knobs, or pulls, to enhance the functionality and aesthetics of the cabinets.
- Measure and mark the desired placement of the hardware, drill pilot holes, and attach them securely.
- Select the hardware that complements the style and design of your kitchen.
- Decorative Elements:
- Consider adding decorative elements to enhance the overall look of your cabinets.
- This can include crown molding along the top of the cabinets, valances above windows or sink areas, or trim accents.
- These decorative touches can add elegance and personality to your kitchen.
- Painting Or Staining:
- If desired, you can paint or stain the cabinets to refresh their appearance or match your preferred color scheme.
- Follow proper painting or staining techniques, ensuring thorough surface preparation and using high-quality products suitable for cabinet finishes.
- Allow sufficient drying time before using the cabinets.
- Lighting:
- Install under-cabinet lighting to improve visibility and create a warm ambiance in your kitchen.
- LED strip lights or puck lights are popular options for illuminating the countertop workspace.
- Plan the wiring carefully, or consult with an electrician, to ensure safe and effective installation.
- Final Cleaning And Inspection:
- Once the installation and finishing touches are complete, thoroughly clean the cabinets and surrounding areas to remove any dust, debris, or fingerprints.
- Inspect the cabinets and ensure that all doors, drawers, and hardware are functioning properly. Make any final adjustments as necessary.
By following these guidelines, you can reinstall the new cabinets with precision, ensuring proper alignment and secure attachment.
The finishing touches, such as filling gaps, applying caulk, installing hardware, and adding decorative elements, will enhance the overall appearance of your kitchen cabinets, creating a polished and cohesive look.
Take your time during this stage to ensure a high-quality finish and enjoy your newly transformed kitchen.
Also Read – Best Insulation for Under Kitchen Units
Can You Replace A Kitchen Sink Without Replacing The Countertop?
Yes, it is possible to replace a kitchen sink without replacing the countertop. Replacing a kitchen sink can be a standalone project that doesn’t require changing the entire countertop.
Here’s a step-by-step guide on how to replace a kitchen sink while keeping the existing countertop:
- Measure And Choose The New Sink: Start by measuring the dimensions of your current sink to ensure that the new sink you choose will fit properly within the existing countertop space. Consider the style, material, and features of the new sink to align with your preferences and kitchen decor.
- Gather Tools And Materials: Collect the necessary tools and materials for the installation, which may include a wrench, pliers, screwdriver, silicone caulk, plumber’s putty, and a bucket or towels to catch water.
- Turn Off The Water Supply: Locate the shut-off valves under the sink and turn them off to cut off the water supply. Test the faucets to ensure the water is completely shut off before proceeding.
- Disconnect Plumbing Connections: Use a wrench or pliers to disconnect the water supply lines connected to the faucet. Place a bucket or towels under the sink to catch any remaining water. Also, disconnect the drain pipe from the sink’s drain assembly.
- Remove The Old Sink: Depending on the type of sink and how it is attached, remove any clips, brackets, or adhesive holding the sink in place. Carefully lift the old sink out of the countertop and set it aside.
- Prepare The New Sink: Before installing the new sink, check the manufacturer’s instructions for any specific preparations or modifications needed. Apply a thin bead of plumber’s putty or silicone caulk around the edge of the sink where it will come into contact with the countertop.
- Install The New Sink: Carefully place the new sink into the existing cutout on the countertop, ensuring it is properly aligned. If the sink has mounting brackets or clips, secure them according to the manufacturer’s instructions. Reconnect the plumbing connections, including the water supply lines and drain pipe, ensuring they are tight and leak-free.
- Test For Leaks And Reconnect Water Supply: Turn the water supply back on and check for any leaks around the connections. If any leaks are detected, tighten the connections as needed. Run the water and check for proper drainage in the sink.
- Apply Caulk And Finishing Touches: Once the sink is securely in place and there are no leaks, apply a bead of silicone caulk around the perimeter of the sink where it meets the countertop. Smooth out the caulk for a neat finish. Clean the sink and surrounding area to remove any debris or residue from the installation.
By following these steps, you can replace a kitchen sink without having to replace the entire countertop.
However, it’s important to note that if the new sink is significantly different in size or shape from the old one, you may need to make modifications to the countertop cutout or seek professional assistance to ensure a proper fit.
Also Read – How to Insulate Under Kitchen Cabinets?
How To Cut Off The Bottom Of A Kitchen Cabinet Without Removing It?
Cutting off the bottom of a kitchen cabinet without removing it can be a challenging task, as it requires precision and careful planning.
Here’s a step-by-step guide to help you accomplish this:
- Prepare The Area: Clear out the cabinet of any items or belongings. Lay down protective sheets or drop cloths to catch any dust or debris that may be generated during the cutting process.
- Measure And Mark: Determine the desired height for the cabinet by measuring and marking the specific amount you want to cut off from the bottom. Use a measuring tape and a pencil to make accurate markings on the cabinet.
- Use A Straightedge: Place a straightedge, such as a level or a long piece of wood, along the marked line. This will serve as a guide to ensure a straight and even cut.
- Choose The Right Tool: Select the appropriate tool for cutting based on the material of the cabinet. For wooden cabinets, a circular saw or a jigsaw with a fine-toothed blade can be used. For laminated or particleboard cabinets, a jigsaw with a blade designed for that specific material may be more suitable.
- Make The Cut:
- Before starting the cutting process, it is essential to wear safety goggles and gloves to protect yourself.
- Position the saw at the edge of the cabinet, aligning it with the marked line.
- Start the saw and guide it along the straightedge, making a slow and steady cut.
- Ensure that the blade is perpendicular to the cabinet to maintain a straight cut.
- Sand And Smooth: Once the cut has been made, use sandpaper or a sanding block to smooth out any rough edges or splinters left from the cutting process. This will provide a clean and finished look to the bottom of the cabinet.
- Clean And Inspect: After cutting and smoothing, thoroughly clean the cabinet to remove any sawdust or debris. Inspect the cut edge to ensure it is level and free from any imperfections. If necessary, use touch-up paint or finish to match the cabinet’s existing color or finish.
It’s important to note that cutting the bottom of a cabinet without removing it may weaken its structural integrity.
If you are unsure about the process or if the cabinet is not suitable for modification, it is recommended to consult a professional or carpenter to assess the feasibility and provide guidance.
Always prioritize safety during the cutting process and proceed with caution. Take accurate measurements, use the appropriate tools, and follow proper safety precautions to achieve a satisfactory result.
Also Read – Effective Ways To Update Old Kitchen Cabinets [Under $100]
Maintenance And Care Tips
Maintenance and care are crucial aspects of keeping your newly installed cabinets and countertop in excellent condition.
By following these tips, you can ensure their longevity and preserve their appearance:
- Regular Cleaning: Clean the cabinets and countertop regularly using a mild, non-abrasive cleaner appropriate for their specific materials. Avoid using harsh chemicals or abrasive scrubbers that can cause damage. Wipe down the surfaces with a soft cloth or sponge, and promptly clean up any spills or stains to prevent permanent discoloration.
- Avoid Excessive Moisture: Prevent excessive moisture exposure to the cabinets and countertop. Wipe up water spills promptly, especially around sinks and areas prone to water splashes. Consider using protective mats or trays under appliances that generate moisture, such as coffee makers or dishwashers.
- Use Cutting Boards And Hot Pads: Protect the countertop surface by using cutting boards when preparing food. Avoid cutting directly on the countertop, as it can scratch or damage the surface. Similarly, use hot pads or trivets under hot cookware or baking dishes to prevent heat damage to the countertop.
- Handle With Care: Be mindful of how you handle the cabinets and countertops. Avoid banging or slamming cabinet doors and drawers, as they can cause structural damage over time. Use proper techniques when opening and closing cabinets to prevent strain on hinges and hardware.
- Preventative Maintenance: Regularly inspect the cabinets and countertop for any signs of wear, loose hinges, or damaged hardware. Tighten loose screws and address any issues promptly to prevent further damage. If you notice any water damage, warping, or other significant issues, consult a professional for repair or replacement.
- Avoid Harsh Chemicals: Refrain from using abrasive or harsh chemical cleaners on the cabinets and countertop, as they can cause discoloration or damage the surface finish. Instead, opt for mild soapy water or cleaners specifically designed for the materials of your cabinets and countertop.
- Follow Manufacturer Guidelines: Refer to the manufacturer’s instructions and guidelines for specific care recommendations tailored to your cabinets and countertop. Different materials may have specific maintenance requirements, so it’s essential to follow their recommendations to maintain warranty coverage and ensure proper care.
By implementing these maintenance and care tips, you can keep your cabinets and countertop looking beautiful and functional for years to come.
Regular cleaning, preventative maintenance, and gentle handling will help preserve their aesthetic appeal and extend their lifespan.
You May Also Like
- Is Murphy Oil Soap Good For Kitchen Cabinets?
- Can You Use Loft Insulation Under Kitchen Cabinets?
- Refacing Kitchen Cabinets: An Ultimate DIY Guide
- What Can I Put Under My Kitchen Sink to Protect My Cabinets?
- Chalk Paint Vs Latex Vs Regular Paint For Kitchen Cabinets
- How To Repair Chipped Paint On Kitchen Cabinets?
- How To Update Old Kitchen Cabinets?
- Does Flooring Go Under Kitchen Cabinets?
Final Thoughts
Congratulations! You have successfully learned how to replace your kitchen cabinets without the need to replace the countertop.
By following the step-by-step guide and implementing the expert tips provided, you’ve discovered a cost-effective and efficient way to give your kitchen a fresh new look.
With your updated cabinets and preserved countertop, you can now enjoy a transformed space that reflects your style and meets your functional needs.
So go ahead and embark on this exciting journey of kitchen renovation, knowing that you’ve achieved a remarkable transformation while keeping your countertop intact.
Enjoy your revitalized kitchen!
FAQ’s
-
How To Remove Lower Kitchen Cabinets Without Damage?
The steps to remove the lower kitchen cabinets without damage will be the same as above. It would be best if you were careful while removing the cabinets.
Don’t rush and pull it forcefully. First, remove all the nuts and screws, then remove the adhesive and slowly pull the cabinets. In this way, it will remove the cabinets without damage. -
How Do I Get Rid Of Old Kitchen Cabinets?
You can do so many things with your old kitchen cabinets. You can transform it into suitable furniture like a shoe rack, wine rack, wall cabinet, console table, kitchen island, etc.
Or, You can flip your furniture to earn some decent money. Flipping furniture is a skill that requires experience and knowledge.
But with the help of this course, you gain that knowledge and experience and start earning some handsome money. -
How To Remove Base Cabinets Without Removing Countertop?
To remove base cabinets without removing the countertop, start by removing all screws, doors, sliders, or fixtures attached to the cabinets.
Next, use a knife to cut any adhesive or bonding between the cabinets and the countertop, then carefully pull the cabinets away from the countertop.
Support the countertop during this process to prevent it from falling or getting damaged. -
Do You Have To Remove Countertops To Replace Cabinets?
In most cases, you do not have to remove countertops to replace cabinets. By following the proper steps and precautions, it is possible to remove and replace base cabinets while keeping the existing countertop intact.
However, if you plan to replace the entire kitchen or make significant changes to the countertop layout, removing the countertop may be necessary. -
Should You Paint Cabinets Or Replace Countertops First?
It is generally recommended to paint cabinets before replacing countertops. Painting cabinets can be a messy process, and there is a risk of paint splatters or drips damaging the countertop if it is already installed.
By painting the cabinets first, you can protect the countertop and ensure a clean and professional finish.
Katrina Smith is a seasoned expert with over 25 years of experience in all things related to cooking and the kitchen. As an avid cook and kitchen enthusiast, she is passionate about sharing her knowledge and expertise on cookware, kitchen appliances, kitchen tips, and kitchen staples.
Through her articles and reviews, Katrina aims to inspire and help others improve their cooking skills, experiment with different ingredients, and invest in quality cookware and appliances.

![3 Effective Ways To Update Old Kitchen Cabinets [Under $100] 4 How To Update Old Kitche Cabinets](https://www.kitchensity.com/wp-content/uploads/2021/05/How-To-Update-Old-Kitche-Cabinets.jpg)
![Refacing Kitchen Cabinets: An Ultimate DIY Guide [2023] 5 Refacing Kitchen Cabinets](https://www.kitchensity.com/wp-content/uploads/2021/05/Refacing-Kitchen-Cabinets.jpg)

It’s nice to know that getting new cabinets can still be possible while also preserving the countertop. I’m interested in looking for a good cabinet installation contractor soon because I plan to buy new pots for my kitchen. Having more storage space for those would be important to look into as well.